Visit Our New Site

This is default featured slide 1 title

Go to Blogger edit html and find these sentences.Now replace these sentences with your own descriptions.

This is default featured slide 2 title

Go to Blogger edit html and find these sentences.Now replace these sentences with your own descriptions.

This is default featured slide 3 title

Go to Blogger edit html and find these sentences.Now replace these sentences with your own descriptions.

This is default featured slide 4 title

Go to Blogger edit html and find these sentences.Now replace these sentences with your own descriptions.

This is default featured slide 5 title

Go to Blogger edit html and find these sentences.Now replace these sentences with your own descriptions.

Showing posts with label Cool tips. Show all posts

Saturday, 27 August 2011

Compress 1GB file to 10MB file with KGB Archiver

Yea the title is true this post tells you how to compress 1GB file into a minimum of 10MB file..!

KGB Archiver is considered the most powerful file compressor nowadays, KGB Archiver can handle zip files, in addition to its own KGB format.


KGB Archiver , an open source compression tool like 7zip and UHARC with an unbelievably high compression rate .It uses AES-256 encryption (one of the strongest encryption known for man) to encrypt archives . The disappointing thing with KGB Archiver is due to its high compression rate its minimum hardware requirement is high ( recommend processor with 1,5GHz clock and 256MB of RAM ) and compression and decompression process is time consuming.

This software is one of the most efficient in its field and due to this requires more time to be able to compress any file, nevertheless all the computers available nowadays are compatible with it.

On the other hand, when it comes to decompressing files KGB Archiver recognizes its own format and ZIP, something that it should improve if it wants to manage to replace the other compression applications.

 Screenshots:


Download this amazing tool from here:


DownloadLinks

http://oron.com/y6notzrm3730

http://www.filesonic.com/file/1772204301/KGB_Archiver_2beta2.msi

Feel free to ask any doubts, dont forget to add comments...!

Tuesday, 16 August 2011

How to Create Your Own Customized Run Commands


Run commandThe Run command on Microsoft Windows operating system allows you to directly open an application or document with just a single command instead of navigating to it’s location and double-clicking the executable icon. However, it only works for some of the inbuilt Windows programs such as Command prompt (cmd), Calculator (calc) etc. So, have you ever wondered how to create your own customized Run commands for accessing your favorite programs, files and folders? Well, read on to find out the answer.

Creating the Customized Run Command

Let me take up an example of how to create a customized run command for opening the Internet explorer. Once you create this command, you should be able to open the Internet explorer just by typing “ie” (without quotes) in the Run dialog box. Here is how you can do that.
1. Right click on your Desktop and select New -> Shortcut.
2. You will see a “Create Shortcut” Dialog box as shown below
Create Shortcut

3. Click on “Browse”, navigate to: Program Files -> Internet Explorer from your Root drive (usually C:\) and select “iexplore” as shown in the above figure and click on “OK”.
4. Now click on “Next” and type any name for your shortcut. You can choose any name as per your choice; this will be your customized “Run command”. In this case I name my shortcut as “ie”. Click on “Finish”.
5. You will see a shortcut named “ie” on your desktop. All you need to do is just copy this shortcut and paste it in your Windows folder (usually “C:/Windows”). Once you have copied the shortcut onto your Windows folder, you can delete the one on your Desktop.
6. That’s it! From now on, just open the Run dialog box, type ie and hit Enter to open the Internet Explorer.
In this way you can create customized Run commands for any program of your choice. Say “ff” for Firefox, “ym” for Yahoo messenger, “wmp” for Windows media player and so on.
To do this, when you click on “Browse” in the Step-3, just select the target program’s main executable (.exe) file which will usually be located in the C:\Program Files folder. Give a simple and short name for this shortcut as per your choice and copy the shortcut file onto the Windows folder as usual. Now just type this short name in the Run dialog box to open the program.

How to Bypass Firewalls & Get into Blocked Websites in School or at Work with FreeProxy (Windows)

Okay kids, you’ve been searching the web for how to get into blocked websites in school, with no luck.  Face it, you’re living in a world where your parents and your teachers want to protect you from the vile and nasty evils that lurk on the Internet. Why?  Are there really child predators hiding in every corner? Is it really critical that you are not allowed to check your Gmail account during your free period at school? The reality is that Internet security “experts” around the globe are taking their jobs just a “tad” too seriously.

Install Windows 7 From USB Drive [Requires 2 Simple Steps] Very Easy


I have found a much easier way to install Windows 7 from a USB Flash drive. Unlike other methods where you have to write complicated commands, this method can be completed even by those who have very little computer background.

The whole process takes only two steps, run UNetbootin, load the Windows 7 ISO file, and finally restart your computer. See how we installed Ubuntu from USB using UNetbootin here.

Before you begin, you will require the following:
USB Flash Drive (4GB minimum)
Windows 7 ISO Image file
UNetbootin


Note: If UNetbootin doesn’t work, try out the Microsoft’s official tool called Windows 7 USB/DVD Tool.

Now insert the USB drive, run UNetbootin, and select Disk Image as ISO. Browse your local drive for Windows 7 ISO that you downloaded and click Open. Now Select Type as USB and choose the drive. Once done, it will look like a bit similar to the screenshot shown below.


Click OK and it will begin extracting all installation files to the USB drive. The whole process will take some time(10-15 minutes), so have patience.


Once the installation is complete, reboot your computer. Now while your system is starting up press the appropriate button(usually F1, F2, F12, ESC, Backspace, or Escape) to bring up Bios Boot Menu. Change the startup order to boot USB by default, usually you will have to press F6 to move the selected USB device on top. Once done, save changes and restart the system.


WINDOWS 7 INSTALLATION SCREEN

Monday, 15 August 2011

Learn How to Create your own SMS channel on Google to update your latest posts through SMS


Step 1:
Open this link on your browser http://labs.google.co.in/smschannels/browse

Step 2: Before subscribing to or creating an SMS Channel, you need to select a nickname and verify your mobile number.
Step 3: Give you nick name and mobile number and click on "send verification code". You will receive an SMS with verification code. Enter verification code and click on finish setup.

DOWNLOAD EVERYTHING: 30+ Firefox Add-ons For Downloading Images, Videos & Files

    downloadeverything.PNG
Every day we all run across content we would like to save a copy of. Sometimes, it’s even legal to do so. This toolbox gives you Firefox add-ons to save just about anything from a webpage you could ever want. Obviously you shouldn’t install these all at once. ;)
File & Page Saving
    Batch Download
Backgroundimage Saver – Helps you save the background image of a page even when hidden behind a transparent GIF.
BatchDownload – Assists you in downloading multiple image links at once.
Bazzacuda Image Saver – Will cycle through your open tabs, if any tab has an image and nothing else, the image will be saved and you can have the tab close automatically.
Downloads in Tab – Moves the download manager to a tab.
Download Manager Tweaker – Open the standard download manager as a separate window, a new tab, or the sidebar.

Thursday, 21 July 2011

How To Trace a Mobile Phone Location with Google Latitude

radar The one drawback of being so heavily into both the latest technologies and cool Internet applications is that when the two seamlessly combine to form the ultimate, ultra-useful application with unlimited potential – it causes you to break into a cold sweat from just the excitement alone. Once I realized that someone can trace a mobile phone location with Google Latitude was possible, I had to run around the block a few times to burn off my excitement before sitting down to write this article.

How Tracing a Mobile Phone Location With Google Latitude Works

The cool thing about Google Latitude is that there are really no fancy, expensive gadgets required. All you need is a mobile phone and you can build what’s essentially a GPS network of friends, without the need for GPS technology. Wondering whether your buddy Jim is still at work? Just log onto Google Latitude, or check Google Maps on your phone, and sure enough, Jim’s icon shows up on the map where he works. Did your best friend go missing after her date the other night? If she left her phone on, all of her friends can check out where she’s currently located.
The potential uses of this technology are amazing, and Google is just getting started by integrated it’s cellular triangulation technology with Google Maps. MakeUseOf authors previously covered similar applications, such as NavXS and BuddyWay. However, BuddyWay requires that the phone or PDA is GPS enabled. The convenience of Google Latitude is that you don’t need GPS, and it’ll work on almost any mobile phone that can use Google Maps. According to Google, these include Android-powered devices, iPhone, BlackBerry, Windows Mobile 5.0+ and Symbian.

tracing a mobile phone location
Setting it up is as easy as typing your phone number into the entry field on the Google Latitude main page, or you can visit “google.com/latitude” with your mobile device and install it directly. It’s basically the latest version of Google Maps with Latitude embedded. Once you’ve installed this version on your phone, you’re good to go – just click on “Menu” and then “Latitude.”

Setting Up Google Latitude With a Network of Friends

Setting up the application on your mobile device is a piece of cake. Once you open Latitude on your phone, you can immediately start adding friends with their email address. If none of your friends have Latitude installed on their phones yet, forward them this article and tell them to install it!
trace mobile number location
When you first fire up the map after you’ve enabled Latitude with your profile, you’ll immediately see your regular Google map pointer replaced by your picture icon, email address and your location the last time your device was polled.
trace your cell phone
This is cool and everything, and as I outlined in a previous MakeUseOf article on Google Maps, this application does a great job keeping the map updated with your status within a certain radius, depending on where the nearest cell towers are. However, while keeping track of yourself on the map while you’re driving or walking around town is fun, it can get pretty boring when you’re doing it alone. Latitude lets you have a little bit of fun with your network of friends by letting you add each of them to your Latitude “friends” list so that you can see their locations too. To test this feature, I called up a friend of mine with a Blackberry down in Derry, New Hampshire, and asked him to fire up Latitude and add me as a friend. Once we confirmed each other as friends, I instantly showed up on his map and he showed up on mine!
added friend
When you click on your friend’s icon, you can see their contact and location information, or you can choose how you want to share your own information with this specific friend. This means that you can pick and choose the level of privacy that you want for your own status updates based on individual friends. You can provide your exact location to your best friend, while keeping your details somewhat vague for your parents. Also, within the Latitude menu, you can set your privacy level for everyone across the board.
privacy
You can toggle your privacy settings back and forth, so that when you’re somewhere that you don’t want anyone to know about, you just flip your status to “Hide your location.” When you’re back where you’re supposed to be, you just flip your privacy back to “Detect your location.” If you want to fool your friends (or your boss) into thinking that you’re somewhere you’re not, you can manually set your location.

Using Google Latitude Online

Of course, tracing a mobile phone location isn’t enough for Google. This is the part that really made me raise my eyebrows. Google has incorporated this mobile technology into an online gadget that you can view and manipulate from your iGoogle page.
igoogle5
This means that even if you don’t have your mobile phone with you, but you have access to the Internet, you can check out where all of your friends are at the moment, or update your own location on Latitude so that they know where you are. This whole concept takes the whole architecture and intent of Twitter and adds another entire level of graphical interactivity to it, with visual, real-time status updates for your friends. The next evolution of this technology that I envision is the ability to embed a Google Latitude widget in your blog or web page that allows you to share your own Latitude location information with your readers. Since the status bar already exists for short text updates, this feature would turn Google Latitude into a more graphical version of Twitter.
Have you ever used any of the latest “friend tracking” mobile phone technologies for tracing a mobile phone location? Which one is your favorite? Share your opinion in the comments section below.

Monday, 11 July 2011

Learn Hacking on your mobile Get daily updates on your cell phone in india and pakistan

Dear Friends many friends told me for updates so i am ready to give this Service,
i can Give you updates on mobile Fone,
just msg me or email me

My Facebook Profile, http://www.facebook.com/jumbohacker
My email :TheUmerRock@yahoo.com
My MSN : jumboboy@live.com

Sunday, 10 July 2011

How To Hide Virus or other Private File into a Jpeg File Like File Binder

Hide File in Picture

In order to accomplish this task, you will need to have either WinZip or WinRAR installed on your computer. You can download either of these two off the Internet and use them without having to pay anything. Here are the steps for creating your hidden stash:
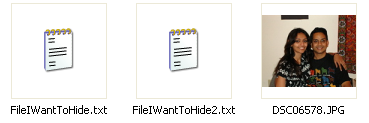
  • Create a folder on your hard drive, i.e. C:\Test and put in all of the files that you want to hide into that folder. Also, place the image that you will be using to hide the files in.
hide file in jpg
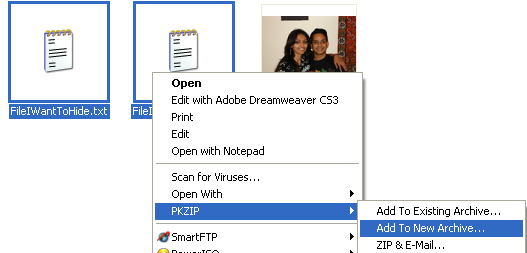
  • Now select all of the files that you want to hide, right-click on them, and choose the option to add them to a compressed ZIP or RAR file. Only select the files you want to hide, not the picture. Name it whatever you want, i,e. “Hidden.rar”.
add to archive
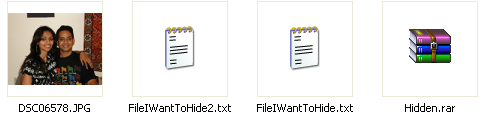
  • Now you should have a folder that looks something like this with files, a JPG image, and a compressed archive:
hidden rar
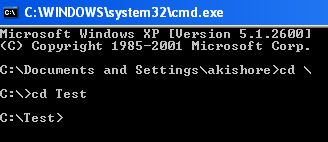
  • Now here’s the fun part! Click on Start, and then click on Run. Type in “CMD” without the quotes and press Enter. You should now see the command prompt window open. Type in “CD \” to get to the root directory. Then type CD and the directory name that you created, i.e. “CD Test“.
cd test
  • Now type in the following line: “copy /b DSC06578.JPG + Hidden.rar DSC06578.jpg” and press Enter. Do not use the quotes. You should get a response like below:
hide files in jpg
Just make sure that you check the file extension on the compressed file, whether it is .ZIP or .RAR as you have to type out the entire file name with extension in the command. I have heard that some people say that they have had problems doing this with a .ZIP extension, so if that doesn’t work, make sure to compress to a .RAR file.
And that’s it! The picture file will have been updated with the compressed archive inside! You can actually check the file size of the picture and see that it has increased by the same amount as the size of the archive.
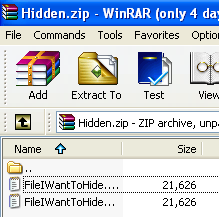
You can access your hidden file in two ways. Firstly, simply change the extension to .RAR and open the file using WinRAR. Secondly, you can just right-click on the JPG image and choose Open With and then scroll down to WinRAR. Either way, you’ll see your hidden files show up that you can then extract out.
winrar
That’s it! That is all it takes to hide files inside JPG picture files! It’s a great way simply because not many people know it’s possible and no one even thinks about a picture as having to the ability to “hide” files. Enjoy!

Wednesday, 6 July 2011

Change FIREFOX Look To GOOGLE CHROME


Google Chrome has an awesome User interface that makes browsing experience amazing as compared to firefox, which has undergone a lot of development, without much attention paid to its look. Due to regular crashes in Chrome, most of us prefer to use firefox, but it would be nice, if you can change the look and feel of firefox, providing it Chrome like interface.


o here is this trick for Firefox addictors, those who can't leave wrking on firefox but wants the look of google chrome. It can be done by using Chromifox.


Chromifox Basic is a coat of chrome for Firefox. It’s a bright and soft blue theme for Firefox on Windows, Mac OS X, and Linux, inspired by the appearance of the Google Chrome browser.


Its freely available on Internet.. just download it and enjoy!!!

Click here to Download

Sunday, 3 July 2011

Best Service to check reputation of your domain or subdomain

Visit Site : http://www.urlvoid.com/
just visit site and Enter any domain and check everything


Friday, 17 June 2011

Get Domain Owner Information Online Best Whois Look up Site


 Here Is the Link http://whois.domaintools.com

Tuesday, 14 June 2011

How to compress 1 Gb data to 10 mb


How did I do it?
You are just about to know… Read on.

I used a software named KGB Archiver.
About KGB archiver: KGB Archiver , an open source compression tool like 7zip and UHARC with an unbelievably high compression rate .It uses AES-256 encryption (one of the strongest encryption known for man) to encrypt archives . The disappointing thing with KGB Archiver is due to its high compression rate its minimum hardware requirement is high ( recommend processor with 1,5GHz clock and 256MB of RAM ) and compression and decompression process is time consuming.
Its strength: Very high compression power with very accurate results and no loss of data.
Its weeknss: Due to high compression , the time required to compress and decompress the file is high. High system requirement
From where can you download this software.?
Learn Hacking has already done that for you. Just click on the link given to Download KGB archiver for free.

Click Here to Download KGB Archiver for free.

I am sure you loved this post.

Monday, 13 June 2011

HOW TO CLEAR BIOS INFORMATION

This is a password hack but it clears the BIOS such that the next time you start the PC, the CMOS does not ask for any password. Now if you are able to bring the DOS prompt up, then you will be able to change the BIOS setting to the default. To clear the CMOS do the following:
Get DOS prompt and type:
DEBUG hit enter
-o 70 2e hit enter
-o 71 ff hit enter
-q hit enter
exit hit enter
Restart the computer. It works on most versions of the AWARD BIOS.

Accessing information on the hard disk

When you turn on the host machine, enter the CMOS setup menu (usually you have to press F2, or DEL, or CTRL+ALT+S during the boot sequence) and go to STANDARD CMOS SETUP, and set the channel to which you have put the hard disk as TYPE=Auto, MODE=AUTO, then SAVE & EXIT SETUP. Now you have access to the hard disk.

Standard BIOS backdoor passwords

The first, less invasive, attempt to bypass a BIOS password is to try on of these standard manufacturer's backdoor passwords:
AWARD BIOS
AWARD SW, AWARD_SW, Award SW, AWARD PW, _award, awkward, J64, j256, j262, j332, j322, 01322222, 589589, 589721, 595595, 598598, HLT, SER, SKY_FOX, aLLy, aLLY, Condo, CONCAT, TTPTHA, aPAf, HLT, KDD, ZBAAACA, ZAAADA, ZJAAADC, djonet, %øåñòü ïpîáåëîâ%, %äåâÿòü ïpîáåëîâ%
AMI BIOS
AMI, A.M.I., AMI SW, AMI_SW, BIOS, PASSWORD, HEWITT RAND, Oder
Other passwords you may try (for AMI/AWARD or other BIOSes)
LKWPETER, lkwpeter, BIOSTAR, biostar, BIOSSTAR, biosstar, ALFAROME, Syxz, Wodj
Note that the key associated to "_" in the US keyboard corresponds to "?" in some European keyboards (such as Italian and German ones), so -- for example -- you should type AWARD?SW when using those keyboards. Also remember that passwords are Case Sensitive. The last two passwords in the AWARD BIOS list are in Russian.

Flashing BIOS via software

If you have access to the computer when it's turned on, you could try one of those programs that remove the password from the BIOS, by invalidating its memory.
However, it might happen you don't have one of those programs when you have access to the computer, so you'd better learn how to do manually what they do. You can reset the BIOS to its default values using the MS-DOS tool DEBUG (type DEBUG at the command prompt. You'd better do it in pure MS-DOS mode, not from a MS-DOS shell window in Windows). Once you are in the debug environment enter the following commands:
AMI/AWARD BIOS
O 70 17
O 71 17
Q
PHOENIX BIOS
O 70 FF
O 71 17
Q
GENERIC
Invalidates CMOS RAM.
Should work on all AT motherboards
(XT motherboards don't have CMOS)
O 70 2E
O 71 FF
Q
Note that the first letter is a "O" not the number "0". The numbers which follow are two bytes in hex format.

Flashing BIOS via hardware

If you can't access the computer when it's on, and the standard backdoor passwords didn't work, you'll have to flash the BIOS via hardware. Please read the important notes at the end of this section before to try any of these methods.

Using the jumpers

The canonical way to flash the BIOS via hardware is to plug, unplug, or switch a jumper on the motherboard (for "switching a jumper" I mean that you find a jumper that joins the central pin and a side pin of a group of three pins, you should then unplug the jumper and then plug it to the central pin and to the pin on the opposite side, so if the jumper is normally on position 1-2, you have to put it on position 2-3, or vice versa). This jumper is not always located near to the BIOS, but could be anywhere on the motherboard.
To find the correct jumper you should read the motherboard's manual.
Once you've located the correct jumper, switch it (or plug or unplug it, depending from what the manual says) while the computer is turned OFF. Wait a couple of seconds then put the jumper back to its original position. In some motherboards it may happen that the computer will automatically turn itself on, after flashing the BIOS. In this case, turn it off, and put the jumper back to its original position, then turn it on again. Other motherboards require you turn the computer on for a few seconds to flash the BIOS.
If you don't have the motherboard's manual, you'll have to "brute force" it... trying out all the jumpers. In this case, try first the isolated ones (not in a group), the ones near to the BIOS, and the ones you can switch (as I explained before). If all them fail, try all the others. However, you must modify the status of only one jumper per attempt, otherwise you could damage the motherboard (since you don't know what the jumper you modified is actually meant for). If the password request screen still appear, try another one.
If after flashing the BIOS, the computer won't boot when you turn it on, turn it off, and wait some seconds before to retry.

Removing the battery

If you can't find the jumper to flash the BIOS or if such jumper doesn't exist, you can remove the battery that keeps the BIOS memory alive. It's a button-size battery somewhere on the motherboard (on elder computers the battery could be a small, typically blue, cylinder soldered to the motherboard, but usually has a jumper on its side to disconnect it, otherwise you'll have to unsolder it and then solder it back). Take it away for 15-30 minutes or more, then put it back and the data contained into the BIOS memory should be volatilized. I'd suggest you to remove it for about one hour to be sure, because if you put it back when the data aren't erased yet you'll have to wait more time, as you've never removed it. If at first it doesn't work, try to remove the battery overnight.
Important note: in laptop and notebooks you don't have to remove the computer's power batteries (which would be useless), but you should open your computer and remove the CMOS battery from the motherboard.

Short-circuiting the chip

Another way to clear the CMOS RAM is to reset it by short circuiting two pins of the BIOS chip for a few seconds. You can do that with a small piece of electric wire or with a bent paper clip. Always make sure that the computer is turned OFF before to try this operation.
Here is a list of EPROM chips that are commonly used in the BIOS industry. You may find similar chips with different names if they are compatible chips made by another brand. If you find the BIOS chip you are working on matches with one of the following you can try to short-circuit the appropriate pins. Be careful, because this operation may damage the chip.
CHIPS P82C206 (square)
Short together pins 12 and 32 (the first and the last pins on the bottom edge of the chip) or pins 74 and 75 (the two pins on the upper left corner).
gnd
74
|__________________
5v 75--| |
| |
| |
| CHIPS |
1 * | |
| P82C206 |
| |
| |
|___________________|
| |
| gnd | 5v
12 32
OPTi F82C206 (rectangular)
Short together pins 3 and 26 (third pin from left side and fifth pin from right side on the bottom edge).
80 51
|______________|
81 -| |- 50
| |
| |
| OPTi |
| |
| F82C206 |
| |
100-|________________|-31
|| | |
1 || | | 30
3 26

Dallas DS1287, DS1287A

Benchmarq bp3287MT, bq3287AMT
The Dallas DS1287 and DS1287A, and the compatible Benchmarq bp3287MT and bq3287AMT chips have a built-in battery. This battery should last up to ten years. Any motherboard using these chips should not have an additional battery (this means you can't flash the BIOS by removing a battery). When the battery fails, the RTC chip would be replaced.
CMOS RAM can be cleared on the 1287A and 3287AMT chips by shorting pins 12 and 21.
The 1287 (and 3287MT) differ from the 1287A in that the CMOS RAM can't be cleared. If there is a problem such as a forgotten password, the chip must be replaced. (In this case it is recommended to replace the 1287 with a 1287A). Also the Dallas 12887 and 12887A are similar but contain twice as much CMOS RAM storage.
__________
1 -| * U |- 24 5v
2 -| |- 23
3 -| |- 22
4 -| |- 21 RCL (RAM Clear)
5 -| |- 20
6 -| |- 19
7 -| |- 18
8 -| |- 17
9 -| |- 16
10 -| |- 15
11 -| |- 14
gnd 12 -|__________|- 13

NOTE: Although these are 24-pin chips,

the Dallas chips may be missing 5 pins,
these are unused pins.
Most chips have unused pins,
though usually they are still present.

Dallas DS12885S

Benchmarq bq3258S
Hitachi HD146818AP
Samsung KS82C6818A
This is a rectangular 24-pin DIP chip, usually in a socket. The number on the chip should end in 6818.
Although this chip is pin-compatible with the Dallas 1287/1287A, there is no built-in battery.
Short together pins 12 and 24.
5v
24 20 13
|___________|____________________|
| |
| DALLAS |
|> |
| DS12885S |
| |
|__________________________________|
| |
1 12
gnd

Motorola MC146818AP

Short pins 12 and 24. These are the pins on diagonally opposite corners - lower left and upper right. You might also try pins 12 and 20.
__________
1 -| * U |- 24 5v
2 -| |- 23
3 -| |- 22
4 -| |- 21
5 -| |- 20
6 -| |- 19
7 -| |- 18
8 -| |- 17
9 -| |- 16
10 -| |- 15
11 -| |- 14
gnd 12 -|__________|- 13

Replacing the chip

If nothing works, you could replace the existing BIOS chip with a new one you can buy from your specialized electronic shop or your computer supplier. It's a quick operation if the chip is inserted on a base and not soldered to the motherboard, otherwise you'll have to unsolder it and then put the new one. In this case would be more convenient to solder a base on which you'll then plug the new chip, in the eventuality that you'll have to change it again. If you can't find the BIOS chip specifically made for your motherboard, you should buy one of the same type (probably one of the ones shown above) and look in your motherboard manufacturer's website to see if there's the BIOS image to download. Then you should copy that image on the chip you bought with an EPROM programmer.

Important

Whether is the method you use, when you flash the BIOS not only the password, but also all the other configuration data will be reset to the factory defaults, so when you are booting for the first time after a BIOS flash, you should enter the CMOS configuration menu (as explained before) and fix up some things.
Also, when you boot Windows, it may happen that it finds some new device, because of the new configuration of the BIOS, in this case you'll probably need the Windows installation CD because Windows may ask you for some external files. If Windows doesn't see the CD-ROM try to eject and re-insert the CD-ROM again. If Windows can't find the CD-ROM drive and you set it properly from the BIOS config, just reboot with the reset key, and in the next run Windows should find it. However most files needed by the system while installing new hardware could also be found in C:WINDOWS, C:WINDOWSSYSTEM, or C:WINDOWSINF .

Key Disk for Toshiba laptops

Some Toshiba notebooks allow to bypass BIOS by inserting a "key-disk" in the floppy disk drive while booting. To create a Toshiba Keydisk, take a 720Kb or 1.44Mb floppy disk, format it (if it's not formatted yet), then use a hex editor such as Hex Workshop (***.bpsoft.com/downloads/index.html) to change the first five bytes of the second sector (the one after the boot sector) and set them to 4B 45 59 00 00 (note that the first three bytes are the ASCII for "KEY" followed by two zeroes). Once you have created the key disk put it into the notebook's drive and turn it on, then push the reset button and when asked for password, press Enter. You will be asked to Set Password again. Press Y and Enter. You'll enter the BIOS configuration where you can set a new password.

Key protected cases

A final note about those old computers (up to 486 and early Pentiums) protected with a key that prevented the use of the mouse and the keyboard or the power button. All you have to do with them is to follow the wires connected to the key hole, locate the jumper to which they are connected and unplug it.

Sunday, 5 June 2011

Gain your Google Bot

sites want their site indexed in google to recieve more hits and thus, make more money with advertisment on their site. Even more interesting is the following question: How do we use this to our advantage ?

Its fairly easy, we have to disguise ourselfs as the google bot and voila, many sites let us in without registration. The parameter we have to change is called the User Agent. The user agent defines the browser and version that you use. For example it would show Internet Explorer as your browser if you are using this one.

Download the plugin for Firefox here

Code:
https://addons.mozilla.org/en-US/firefox/addon/59

Then you need to alter the UAS settings (Tools – User Agent Switcher – Options – Options – User Agents – Add) to the following:]

[Image: zz0480467a.jpg]


Just restart ur firefox and switch the user agent to Google-Bot and viola ;p

For other Browsers

You can do so in Opera with ease. For Internet Explorer you need to change registry entries.

Windows Registry Editor Version 5.00 [HKEY_LOCAL_MACHINESOFTWAREMicrosoftWindowsCurrentVersionInternet Settings5.0User Agent] @="Googlebot/2.1" "Compatible"="+http://www.googlebot.com/bot.html"

Save this as ua.reg and execute.

To revert the changes back, you need the following:

Windows Registry Editor Version 5.00 [HKEY_LOCAL_MACHINESOFTWAREMicrosoftWindowsCurrentVersionInternet Settings5.0User Agent] @="Mozilla/4.0 (compatible; MSIE 6.0; Windows NT 5.1)"

Save as oua.reg and execute.

This maybe an old trick but effective especially when u r too lazy to register on a site just to view
some content.

Tuesday, 31 May 2011

4 Ways to Identify Safe Websites on the Internet


Safe Websites
On the whole Internet, there are approximately more than 150 million active websites up and running. As a result, it often becomes a real challenge for the users to identify safe websites that are trustworthy and reputed. Have you ever wondered to know the reputation of a website before placing the order? Need to know whether a given website is child safe? Well, here are some of the ways to identify safe websites on the Web.
 

1. WOT or Web Of Trust (www.mywot.com):

WOT is a great place to test the reputation of your favorite website. WOT gives real-time ratings for every website based on the feedback that it gets from millions of trustworthy users across the globe and trusted sources, such as phishing and malware blacklists. Each domain name is evaluated based on this data and ratings are applied to them accordingly. A snapshot of WOT ratings for gohacking.com is shown below:
WOT Ratings for Gohacking.com


As shown in the above snapshot, the reputation of each website is shown in terms of 4 components where green means excellent, yellow warns users to be cautious and red indicates potential danger.
 
Trustworthiness signifies the overall safety of the website. A poor rating may indicate that the site is associated with threats like Internet scams, phishing, identity theft risks and malware.
 
Vendor reliability tells you whether a given site is safe for carrying out buy and sell transactions with it. An excellent rating indicates superior customer satisfaction while a poor rating indicates possible scam or bad shopping experience.
 
Privacy indicates about “to what extent the site respects the privacy of it’s users and protects their personal identity and data”.
 
Child Safety indicates whether the content of a given site is appropriate for children. Site contents like sexual material, nudity and vulgarity will have a poor Child Safety rating.
 
In most cases, the WOT ratings are found to be highly accurate. To check the reputation of any given website, just visit www.mywot.com type-in the address of your favorite website and click on “Check now”. This tool alone can tell you a lot about the reputation and safety level of a website. However, in addition to this, I am giving you another 3 handy tools to identify safe websites on the Web.
 

2. McCafee SiteAdvisor:

McCafee SiteAdvisor is a free tool that is available as a browser add-on. It adds safety ratings to your browser and search engine results. You can download it from www.siteadvisor.com.
 

3. StopBadware:

Using this tool, you can check whether a given site is said to have involved in malware activity in the past. To check this, go to http://www.stopbadware.org/home/reportsearch and enter the URL or domain name of a website and click on “Search Clearinghouse ”. If the search does not return any result, that means the site was never involved in any of the malware activity in the past.
 

4. Google Pagerank:

Google PageRank is another great tool to check the reputation and popularity of a website. The PageRank tool rates every webpage on a scale of 1 to 10 which indicates Google’s view of importance of the page. If a given website has a PageRank of less than 3, then it is said to be less popular among the other sites on the Internet.
 
However, PageRank will only tell you how much popular a given website is and has nothing to do with the safety level of a website. So, this tool alone cannot be used to evaluate a website’s safety and other factors.
 
PageRank feature is available as a part of Google Toolbar. You can install Google Toolbar from http://www.google.com/intl/en_uk/toolbar/ie/index.html.
 
I hope you like this article. Waiting for your comments…

Monday, 30 May 2011

Cmd/Dos Prompt Commands most using hacking Commands


Full Codes. Kindly Add if U know more !
full RUN commands and COMMAND PROMPT commands


Accessibility Controlsaccess.cpl
Add Hardware Wizardhdwwiz.cpl
Add/Remove Programsappwiz.cpl
Administrative Toolscontrol admintools
Automatic Updateswuaucpl.cpl
Bluetooth Transfer Wizardfsquirt
Calculatorcalc
Certificate Managercertmgr.msc
Character Mapcharmap
Check Disk Utilitychkdsk
Clipboard Viewerclipbrd
Command Promptcmd
Component Servicesdcomcnfg
Computer Managementcompmgmt.msc
timedate.cplddeshare
Device Managerdevmgmt.msc
Direct X Control Panel (If Installed)*directx.cpl
Direct X Troubleshooterdxdiag
Disk Cleanup Utilitycleanmgr
Disk Defragmentdfrg.msc
Disk Managementdiskmgmt.msc
Disk Partition Managerdiskpart
Display Propertiescontrol desktop
Display Propertiesdesk.cpl
Display Properties (w/Appearance Tab Preselected)control color
Dr. Watson System Troubleshooting Utilitydrwtsn32
Driver Verifier Utilityverifier
Event Viewereventvwr.msc
File Signature Verification Toolsigverif
Findfastfindfast.cpl
Folders Propertiescontrol folders
Fontscontrol fonts
Fonts Folderfonts
Free Cell Card Gamefreecell
Game Controllersjoy.cpl
Group Policy Editor (XP Prof)gpedit.msc
Hearts Card Gamemshearts
Iexpress Wizardiexpress
Indexing Serviceciadv.msc
Internet Propertiesinetcpl.cpl
IP Configuration (Display Connection Configuration)ipconfig /all
IP Configuration (Display DNS Cache Contents)ipconfig /displaydns
IP Configuration (Delete DNS Cache Contents)ipconfig /flushdns
IP Configuration (Release All Connections)ipconfig /release
IP Configuration (Renew All Connections)ipconfig /renew
IP Configuration (Refreshes DHCP & Re-Registers DNS)ipconfig /registerdns
IP Configuration (Display DHCP Class ID)ipconfig /showclassid
IP Configuration (Modifies DHCP Class ID)ipconfig /setclassid
Java Control Panel (If Installed)jpicpl32.cpl
Java Control Panel (If Installed)javaws
Keyboard Propertiescontrol keyboard
Local Security Settingssecpol.msc
Local Users and Groupslusrmgr.msc
Logs You Out Of Windowslogoff
Microsoft Chatwinchat
Minesweeper Gamewinmine
Mouse Propertiescontrol mouse
Mouse Propertiesmain.cpl
Network Connectionscontrol netconnections
Network Connectionsncpa.cpl
Network Setup Wizardnetsetup.cpl
Notepadnotepad
Nview Desktop Manager (If Installed)nvtuicpl.cpl
Object Packagerpackager
ODBC Data Source Administratorodbccp32.cpl
On Screen Keyboardosk
Opens AC3 Filter (If Installed)ac3filter.cpl
Password Propertiespassword.cpl
Performance Monitorperfmon.msc
Performance Monitorperfmon
Phone and Modem Optionstelephon.cpl
Power Configurationpowercfg.cpl
Printers and Faxescontrol printers
Printers Folderprinters
Private Character Editoreudcedit
Quicktime (If Installed)QuickTime.cpl
Regional Settingsintl.cpl
Registry Editorregedit
Registry Editorregedit32
Remote Desktopmstsc
Removable Storagentmsmgr.msc
Removable Storage Operator Requestsntmsoprq.msc
Resultant Set of Policy (XP Prof)rsop.msc
Scanners and Camerassticpl.cpl
Scheduled Taskscontrol schedtasks
Security Centerwscui.cpl
Servicesservices.msc
Shared Foldersfsmgmt.msc
Shuts Down Windowsshutdown
Sounds and Audiommsys.cpl
Spider Solitare Card Gamespider
SQL Client Configurationcliconfg
System Configuration Editorsysedit
System Configuration Utilitymsconfig
System File Checker Utility (Scan Immediately)sfc /scannow
System File Checker Utility (Scan Once At Next Boot)sfc /scanonce
System File Checker Utility (Scan On Every Boot)sfc /scanboot
System File Checker Utility (Return to Default Setting)sfc /revert
System File Checker Utility (Purge File Cache)sfc /purgecache
System File Checker Utility (Set Cache Size to size x)sfc /cachesize=x
System Propertiessysdm.cpl
Task Managertaskmgr
Telnet Clienttelnet
User Account Managementnusrmgr.cpl
Utility Managerutilman
Windows Firewallfirewall.cpl
Windows Magnifiermagnify
Windows Management Infrastructurewmimgmt.msc
Windows System Security Toolsyskey
Windows Update Launcheswupdmgr
Windows XP Tour Wizardtourstart
Wordpadwrite
Run line commands can be very useful some times, its better to know them here are all the commands that i know u might find them usefull too Commands are same for Windows xp pro and home 

Run Line Commands


These are GUI applications that can be opened from the run line.
These applications are not located in the C:\windows\system32\ directory, the
keys for these applications are located in the registry under: 
HKLM\software\microsoft\windows\currentversion\app paths BCKGZM.EXE - Backgammon
CHKRZM.EXE - Checkers
CONF.EXE - NetMeeting
DIALER.EXE - Phone Dialer
HELPCTR.EXE - Help and Support
HRTZZM.EXE - Internet Hearts
HYPERTRM.EXE - HyperTerminal
ICWCONN1.EXE - Internet Connection Wizard
IEXPLORE.EXE - Internet Explorer
INETWIZ.EXE - Setup Your Internet Connection
INSTALL.EXE - User's Folder
MIGWIZ.EXE - File and Settings Transfer Wizard
MOVIEMK.EXE - Windows Movie Maker
MPLAYER2.EXE - Windows Media Player Version 6.4.09.1120
MSCONFIG.EXE - System Configuration Utility
MSIMN.EXE - Outlook Express
MSINFO32.EXE - System Information
MSMSGS.EXE - Windows Messenger
MSN6.EXE - MSN Explorer
PBRUSH.EXE - Paint
PINBALL.EXE - Pinball
RVSEZM.EXE - Reversi
SHVLZM.EXE - Spades
TABLE30.EXE - User's Folder
WAB.EXE - Windows Address Book
WABMIG.EXE - Address Book Import Tool
WINNT32.EXE - User's Folder
WMPLAYER.EXE - Windows Media Player
WRITE.EXE - Wordpad

These .EXE files reside in (c:\windows\system32\) or (c:\windows\) directory.
ACCWIZ.EXE - Accessibility Wizard
CALC.EXE - Calculator
CHARMAP.EXE - Character Map
CLEANMGR.EXE - Disk Space Cleanup Manager
CLICONFG.EXE - SQL Client Configuration Utility
CLIPBRD.EXE - Clipbook Viewer
CLSPACK.EXE - Class Package Export Tool
CMD.EXE - Command Line
CMSTP.EXE - Connection Manager Profile Installer
CONTROL.EXE - Control Panel
DCOMCNFG.EXE - Component Services
DDESHARE.EXE - DDE Share
DRWATSON.EXE - Doctor Watson v1.00b
DRWTSN32.EXE - Doctor Watson Settings
DVDPLAY.EXE - DVD Player
DXDIAG.EXE - DirectX Diagnostics
EUDCEDIT.EXE - Private Character Editor
EVENTVWR.EXE - Event Viewer
EXPLORER.EXE - Windows Explorer
FREECELL.EXE - Free Cell
FXSCLNT.EXE - Fax Console
FXSCOVER.EXE - Fax Cover Page Editor
FXSEND.EXE - MS Fax Send Note Utility
IEXPRESS.EXE - IExpress 2.0
LOGOFF.EXE - System Logoff
MAGNIFY.EXE - Microsoft Magnifier
MMC.EXE - Microsoft Management Console
MOBSYNC.EXE - Microsoft Synchronization Manager
MPLAY32.EXE - Windows Media Player version 5.1
MSHEARTS.EXE - Hearts
MSPAINT.EXE - Paint
MSTSC.EXE - Remote Desktop Connection
NARRATOR.EXE - Microsoft Narrator
NETSETUP.EXE - Network Setup Wizard
NOTEPAD.EXE - Notepad
NSLOOKUP.EXE - NSLookup Application
NTSD.EXE - Symbolic Debugger for Windows 2000
ODBCAD32.EXE - ODBC Data Source Administrator
OSK.EXE - On Screen Keyboard
OSUNINST.EXE - Windows Uninstall Utility
PACKAGER.EXE - Object Packager
PERFMON.EXE - Performance Monitor
PROGMAN.EXE - Program Manager
RASPHONE.EXE - Remote Access Phonebook
REGEDIT.EXE - Registry Editor
REGEDT32.EXE - Registry Editor
RESET.EXE - Resets Session
RSTRUI.EXE - System Restore
RTCSHARE.EXE - RTC Application Sharing
SFC.EXE - System File Checker
SHRPUBW.EXE - Create Shared Folder
SHUTDOWN.EXE - System Shutdown
SIGVERIF.EXE - File Signature Verification
SNDREC32.EXE - Sound Recorder
SNDVOL32.EXE - Sound Volume
SOL.EXE - Solitaire

SPIDER.EXE - Spider Solitaire
SYNCAPP.EXE - Create A Briefcase
SYSEDIT.EXE - System Configuration Editor
SYSKEY.EXE - SAM Lock Tool
TASKMGR.EXE - Task Manager
TELNET.EXE - MS Telnet Client
TSSHUTDN.EXE - System Shutdown
TOURSTART.EXE - Windows Tour Launcher
UTILMAN.EXE - System Utility Manager
USERINIT.EXE - My Documents
VERIFIER.EXE - Driver Verifier Manager
WIAACMGR.EXE - Scanner and Camera Wizard
WINCHAT.EXE - Windows for Workgroups Chat
WINHELP.EXE - Windows Help Engine
WINHLP32.EXE - Help
WINMINE.EXE - Minesweeper
WINVER.EXE - Windows Version Information
WRITE.EXE - WordPad
WSCRIPT.EXE - Windows Script Host Settings
WUPDMGR.EXE - Windows Update

The following are Control Panel applets that can be run from the run line.
They are located in the c:\windows\system32 directory, and have the file type
extension ".CPL".
ACCESS.CPL - Accessibility Options
APPWIZ.CPL - Add or Remove Programs
DESK.CPL - Display Properties
HDWWIZ.CPL - Add Hardware Wizard
INETCPL.CPL - Internet Explorer Properties
INTL.CPL - Regional and Language Options
JOY.CPL -                 Game Controllers
MAIN.CPL -               Mouse Properties
MMSYS.CPL -           Sounds and Audio Device Properties
NCPA.CPL -              Network Connections
NUSRMGR.CPL -    User Accounts
ODBCCP32.CPL -   ODBC Data Source Administrator
POWERCFG.CPL -  Power Options Properties
SYSDM.CPL -          System Properties
TELEPHON.CPL -   Phone and Modem Options
TIMEDATE.CPL -    Date and Time Properties
The following are Microsoft Management Console Snap-ins that can be opened from
the run line. These applications have the file type extension ".MSC".


CERTMGR.MSC - Certificates
CIADV.MSC -         Indexing Service
COMPMGMT.MSC - Computer Management
DEVMGMT.MSC - Device Manager
DFRG.MSC - Disk Defragmenter
DISKMGMT.MSC - Disk Management
EVENTVWR.MSC - Event Viewer
FSMGMT.MSC - Shared Folders
LUSRMGR.MSC - Local Users and Groups
NTMSMGR.MSC - Removable Storage
NTMSOPRQ.MSC - Removable Storage Operator Requests
PERFMON.MSC - Performance Monitor
SERVICES.MSC - Services
WMIMGMT.MSC - Windows Management Infrastructure


Calculation on command Prompt ! u knew this???


The command processor CMD.EXE comes with a mini-calculator that can perform simple arithmetic on 32-bit signed integers:

C:\>set /a 2+2
4
C:\>set /a 2*(9/2)
8
C:\>set /a (2*9)/2
9
C:\>set /a "31>>2"
7

Note that we had to quote the shift operator since it would otherwise be misinterpreted as a "redirect stdout and append" operator.

For more information, type set /? at the command prompt.